Working with Fragments in Android

 Now that we have understood what fragments are, its time for a practical example. To create a fragment, we have to define a fragment class, which extends the class Fragment and overrides the necessary methods to create the fragment.

import android.os.Bundle;
import android.support.v4.app.Fragment;
import android.view.LayoutInflater;
import android.view.ViewGroup;

public class ExampleFragment extends Fragment {
    @Override
    public View onCreateView(LayoutInflater inflater, ViewGroup container,
        Bundle savedInstanceState) 
    {
        // Inflate the layout for this fragment
        return inflater.inflate(R.layout.fragment_view, container, false);
    }
}

In the code above, fragment_view layout is the layout of the fragment which is generally defined in a separate XML file with name fragment_view.xml


To add a fragment to any activity, you can follow any of the following 2 approach:

  1. Specify the fragment directly in the main layout XML file. Basic fragment code in XML looks like:
    <fragment
        android:name="com.studytonight.android.fragments.ExampleFragment"
        android:id="@+id/fragments"
        android:layout_width="match_parent"
        android:layout_height="match_parent" />

    Where the attribute android:name will hold the fully qualified name of the fragment class.

  2. Or, you can use a FrameLayout to add the fragment at runtime to your activity. We will discuss this approach in detail, but first, lets learn how to implement a basic fragment in our android app.

Basic Implementation of Fragment

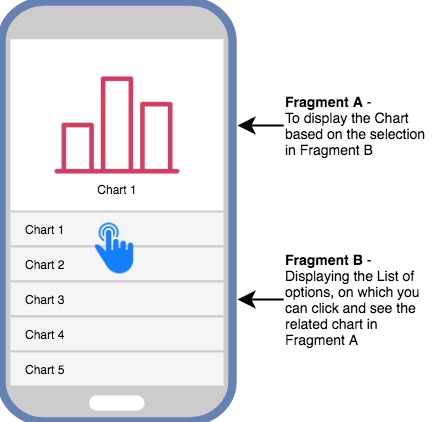
In this example we will see how to add a fragment to an activity, by adding the fragment directly in our app's main layout XML file. In this example we will create 2 fragments and will add them to our main activity.

Below is the code for our activity_main.xml file or the main layout XML file:

<RelativeLayout xmlns:android="http://schemas.android.com/apk/res/android"  
    android:layout_width="fill_parent"  
    android:layout_height="fill_parent" > 
    
    <fragment  
        android:id="@+id/fragmentOne"  
        android:name="com.studytonight.fragmentexample.FragmentOne"  
        android:layout_height="0dp"
        android:layout_width="match_parent"
        android:layout_weight="1" /> 
  
    <fragment  
        android:id="@+id/fragmentTwo"  
        android:name="com.studytonight.fragmentexample.FragmentTwo"  
        android:layout_height="0dp"
        android:layout_width="match_parent"
        android:layout_weight="1"
        android:layout_below="@id/fragmentOne" />
  
</RelativeLayout>  

Layout of the first fragment will be defined in fragment_one.xml file.

<?xml version="1.0" encoding="utf-8"?> 

<LinearLayout xmlns:android="http://schemas.android.com/apk/res/android"  
    android:layout_width="match_parent"  
    android:layout_height="match_parent"  
    android:orientation="vertical"  
    android:background="#2c2e43" >  
  
    <TextView  
        android:id="@+id/textViewOne"  
        android:layout_width="wrap_content"  
        android:layout_height="wrap_content" 
        android:textColor="#FFFFFF"
        android:gravity="center_horizontal"
        android:text="First Fragment" />
  
</LinearLayout>  

And the corresponding fragment class FragmentOne will be:

package com.studytonight.fragmentexample;  
  
import android.app.Fragment;  
import android.os.Bundle;  
import android.view.LayoutInflater;  
import android.view.View;  
import android.view.ViewGroup;  
  
public class FragmentOne extends Fragment {  
    @Override  
    public View onCreateView(LayoutInflater inflater, ViewGroup container,  
            Bundle savedInstanceState) 
    {  
        // TODO Auto-generated method stub  
        return inflater.inflate(R.layout.fragment_one, container, false);  
    }  
  
}

Similarly, the layout XML file and the class for the second fragment will be:

fragment_two.xml

<?xml version="1.0" encoding="utf-8"?> 

<LinearLayout xmlns:android="http://schemas.android.com/apk/res/android"  
    android:layout_width="match_parent"  
    android:layout_height="match_parent"  
    android:orientation="vertical"  
    android:background="#ff9100" >  
  
    <TextView  
        android:id="@+id/textViewTwo"  
        android:layout_width="wrap_content"  
        android:layout_height="wrap_content"
        android:textColor="#FFFFFF"
        android:gravity="center_horizontal"
        android:text="Second Fragment" />
  
</LinearLayout>  

FragmentTwo.java

package com.studytonight.fragmentexample;  
  
import android.app.Fragment;  
import android.os.Bundle;  
import android.view.LayoutInflater;  
import android.view.View;  
import android.view.ViewGroup;  
  
public class FragmentTwo extends Fragment {  
    @Override  
    public View onCreateView(LayoutInflater inflater, ViewGroup container,  
            Bundle savedInstanceState) 
    {  
        // TODO Auto-generated method stub  
        return inflater.inflate(R.layout.fragment_two, container, false);  
    }  
  
}

Finally, the code for the main actvity class MainActivity.java will be as follows:

package com.studytonight.fragmentexample;
  
import android.os.Bundle;  
import android.app.Activity;  
import android.view.Menu;  
public class MainActivity extends Activity {  
  
    @Override  
    protected void onCreate(Bundle savedInstanceState) {  
        super.onCreate(savedInstanceState);  
        setContentView(R.layout.activity_main);  
    }  
}

Once everything is in place, run the android app to see the output.


Output Screen

Basic Fragment Example


Updating Fragment at Runtime

We can also add, remove or update a fragment component in an activity at runtime too. For adding a fragment at runtime, we have to use FrameLayout in out main layout XML file to define the position where we want to add the fragment.

To add/replace/remove a fragment at runtime, FragmentManager and FragmentTransaction to gracefully perfrom the operation of adding, replacing and removing fragments.

Following is how we add a FrameLayout to our layout XML file:

<RelativeLayout xmlns:android="http://schemas.android.com/apk/res/android"  
    android:layout_width="fill_parent"  
    android:layout_height="fill_parent" > 
    
    <FrameLayout  
        android:id="@+id/frameLayout"
        android:layout_width="match_parent"
        android:layout_height="match_parent" /> 
  
</RelativeLayout>  

And this is how we use the fragment manager and transaction classes:

// get fragment manager
FragmentManager fm = getFragmentManager();

// add a new fragment
FragmentTransaction ft = fm.beginTransaction();
ft.add(R.id.your_placehodler, new FragmentOne());
// commit the change
ft.commit();

// replace a fragment
FragmentTransaction ft = fm.beginTransaction();
ft.replace(R.id.your_placehodler, new FragmentTwo());
ft.commit();

// remove a fragment
Fragment fragment = fm.findFragmentById(R.id.fragmentTwo);
FragmentTransaction ft = fm.beginTransaction();
ft.remove(fragment);
ft.commit();

This can be used, when on click of some button etc we have to show different information, in that case we can update the fragment on button click.

You must be thinking, Why we need a Manager and Transaction class for updating or adding a fragment? Well, as a fragment is loaded asynchronously, and the changes to the activity are being made at runtime, hence to take care of these factors, FragmentTransaction class is used, which performs all the operation in a transaction, which means, if anything goes wrong, it will revert back the UI to the last stable state.


Fragments in Android

 A Fragment in Android is a component which can be used over an activity to define an independent modular UI component attached to the activity. It functions independently, but as it is linked to the Activity, when an activity is destroyed, the fragment also gets destroyed.

If you know Biology, and are aware of the concept of Host and Parasite, then in Android, Activity is the host while a Fragment is a parasite.

Fragment has its own lifecycle events, which are different from an Activity's lifecylce events.

An Activity can have any number of fragments in it, although it is suggested to not to use too many fragments in a single activity.

Also, a fragment is a re-usable component, hence, a single fragment can be included in multiple activities, if required.

Generally, fragments are used to create multi-pane UI in Android apps.

A Fragment has it's own Layout for the UI(user interface), but we can even define a fragment without any layout, to implement a behavious which has no user interface, more like a background service.

So, Fragment is a very interesting component of Android OS which can be used in multiple ways in an android app.


Why we need Fragments in Android?

If we already have Activity, and a Fragment is just like a sub-activity, then what is the use of having an additional component in Android?

Well, before the introduction of Fragments(Fragments were added in Honeycomb version of Android i.e API version 11), we could only have a single Activity on a screen at a given point of time, and there was no way to divide the screen and control the different parts separately.

And as the screen size of the Mobile devices are increasing, it makes more sense to show more stuff at the same time on the screen, hence Fragments are very useful, and are very popular amongst the Android developers community.

Android Fragment example


The usage of Fragment in an android app totally depends on the screen size of the device on which the app is being used. If the screen size is big, then we can easily show 2 or maybe more fragments on the screen, but if the display size is smaller, it is advised to use Fragments in separate activities.

Android Fragment example for Tablet and Mobile

Therefore it is also suggested to keep the design of a Fragment modular and independent, so that it can be used on different screens/activity based on the screen size or any other factor.

Main use of Fragments in Android

Following are the 3 main usage of Fragments in Android, for which Fragments were introduced:

  1. Modularity: If a single activity is having too many functional components, its better to divide it into independent fragments, hence making the code more organized and easier to maintain.
  2. Reusability: If we define aany particular feature in a fragment, then that feature more or less becomes a reusable component which can be easily intgerated into any activity.
  3. Adaptability: If we break UI components of an app screen into fragments, then it becomes easier to change their orientation and placement, based on screen size etc.

Fragment Life Cycle

The Fragment lifecycle begins when it is attached to an activity. Below we have shown the complete lifecycle of fragment in form of a flow chart.

Fragment Lifecycle in Android


Lifecycle Methods for Fragment

This is called when the fragment becomes active or interactive.
Method NameDescription
onAttach(Activity)It is called once, when the fragment is attached to the activity.
onCreate(Bundle)The system calls this method when a fragment is created. This is an important method and you should implement the essential components of the fragment in this method.
onCreateView()This method is called when the UI of the fragment has to be initialised. It is called when the fragment is first created and then when the fragment returns back to the layout from the back stack. This method usually returns a View component but if the fragment doesn't have a UI, then you can return a null.
onActivityCreated()This method is called when the host activity is created. By this time, we can even access the fragment's view using the findViewById() method.
onStart()This method is called when the fragment becomes visible on the device's screen.
onResume()
onPause()This is called when a fragemnt is no longer interactive and the user is about to leave the fragment. At this point, it is suggested to save any data for the existing user session, if required.
onStop()This method is called when the fragment is no longer visible.
onDestroyView()This is called when the fragment is to be be destroyed. Here you can do the clean up the resources before the fragment is destroyed.
onDestroy()This is called for the final clean up of fragment's state.
onDetach()It is called just before the fragment is detached from the host activity.

In our next tutorial, we will learn how to implement Fragments in android.


Working easily with FCM push notifications in Android

 Sometimes I have found my self looking for different sources in addition to the original ones because they are not enough to achieve what I’m looking for. In easy words, after I read how to work with Firebase Cloud Messaging’ push notifications in Android, I felt that I needed more clarification, more specific scenarios, how to test its functionality and that is what I’m going to explain in the article.

Firstly, we need a way to test a more accurate scenario, I mean, from Firebase Console in Cloud Messaging section is the easiest way to send and receive notifications. Then a simple notification will be displayed with a title, the text will be what we put on the Message text in the console and the default app icon will complete the notification.

This is cool, and it’s an easy way to see the push notifications in action, but it has a big problem, because if we send a notification while the app is in foreground, it will not be displayed. The best option to test the feature in a clear and easy way is sending the notification using the command line.

How?

We can leverage Firebase to act like our backend server making a POST call to this endpoint:

https://fcm.googleapis.com/fcm/send

This is a better approach than the console because we can use more parameters like in the real world.

Using this CURL command (which I took from Miquel Beltran’s article) a notification can be sent:

I recommend using CocoaRest Client to run easily this CURL setting the main URL, the headers and pasting the body in a raw input.

UPDATE 1:
This is not the scope of this article, but I also wrote a little guide to fix the deprecation of getInstance().getToken() to get the registration device token from FCM, then you can fix it as well.

UPDATE 2 (2019–11–04)

For current versions of the FCM library, FirebaseInstanceId class is no longer available, then I wrote how to fix it and still work with FCM just changing a couple of things.

How to handle notifications in foreground

When the app is in foreground, all received messages are processed by the app and if you need to do some logic with them (i.e get the message details and locally save them in a database) or change the UI (use a larger icon or change the status bar icon) of the notification in the onMessageReceived method from the class which extends from FirebaseMessagingService is the place we need to do it:

If we don’t do anything, the notification will not be displayed.

The most important concept here is that onMessageReceive is ONLY called when the app is in foreground, if the app if is background, the Google Services will take care of displaying the message.

How to handle notifications in background

Instead of sending a “notification” entry in the payload (using the same CURL above), change it for a “data” entry. In this way the notifications will ALWAYS be managed by the app through onMessageReceived (we can also send a lot of more information such as an object id or an specific icon or a type of object):

Then the way to get the data will be something like this, and later do the proper logic with that data:

We also need to remember to create our own notification object which will be displayed in the status bar (is the only way to show it):

  NotificationManagerCompat manager = NotificationManagerCompat.from(getApplicationContext());
manager.notify(/*notification id*/0, notification);
}

I know that is not well explained in Firebase’s official doc, but we all can better read and read it again (like me xD ) to finally understand it.

In summary

If we need to do some logic with the information sent from Firebase, and always “guarantee” to receive it and process it (no matter if the app is in background or foreground) always send the payload with a “data” entry. It will be processed always inside the onMessageReceived method.

Do not send the “notification” entry, because in this way onMessageReceived method will never be called, and Google Services process (the device’s SO) will get the message and automatically show it. In this scenario we have the option to get the info (for example the “data” entryafter the user taps on the notification icon in the status bar. Then the notification automatically will call the app’s launcher Activity and through getIntent().getExtras() method obtain the “data”.

The main drawbacks of this are that if the user dismiss a notification, neither data will be obtained nor customisations over the notifications can’t be done.

How to extract filename from Uri?

Now, we can extract filename with and without extension :) You will convert your bitmap to uri and get the real path of your file. Now w...