How to Make Circle ImageView

This code segment which makes your ImageView to a perfect circle or which angle do you want a rounded ImageView.


Gist:
java
// Circle ImageView Function (Could be custom rounded)
public static Bitmap getRoundedCornerBitmap(Bitmap bitmap, int pixels) {
    Bitmap output = Bitmap.createBitmap(bitmap.getWidth(), bitmap
            .getHeight(), Bitmap.Config.ARGB_8888);
    Canvas canvas = new Canvas(output);

    final int color = 0xff424242;
    final Paint paint = new Paint();
    final Rect rect = new Rect(0, 0, bitmap.getWidth(), bitmap.getHeight());
    final RectF rectF = new RectF(rect);
    final float roundPx = pixels;

    paint.setAntiAlias(true);
    canvas.drawARGB(0, 0, 0, 0);
    paint.setColor(color);
    canvas.drawRoundRect(rectF, roundPx, roundPx, paint);

    paint.setXfermode(new PorterDuffXfermode(PorterDuff.Mode.SRC_IN));
    canvas.drawBitmap(bitmap, rect, rect, paint);

    return output;
}

// USAGE
ImageView imageView = (ImageView) findViewById(R.id.imageView);
Bitmap bitmap = BitmapFactory.decodeResource(getResources(), R.drawable.awesome);
imageView.setImageBitmap(getRoundedCornerBitmap(bitmap, 360));


Markdown:
//Circle ImageView Function (Could be custom rounded)
public static Bitmap getRoundedCornerBitmap(Bitmap bitmap, int pixels) {
    Bitmap output = Bitmap.createBitmap(bitmap.getWidth(), bitmap
            .getHeight(), Bitmap.Config.ARGB_8888);
    Canvas canvas = new Canvas(output);

    final int color = 0xff424242;
    final Paint paint = new Paint();
    final Rect rect = new Rect(0, 0, bitmap.getWidth(), bitmap.getHeight());
    final RectF rectF = new RectF(rect);
    final float roundPx = pixels;

    paint.setAntiAlias(true);
    canvas.drawARGB(0, 0, 0, 0);
    paint.setColor(color);
    canvas.drawRoundRect(rectF, roundPx, roundPx, paint);

    paint.setXfermode(new PorterDuffXfermode(PorterDuff.Mode.SRC_IN));
    canvas.drawBitmap(bitmap, rect, rect, paint);

    return output;
}

// USAGE
ImageView imageView = (ImageView) findViewById(R.id.imageView);
Bitmap bitmap = BitmapFactory.decodeResource(getResources(), R.drawable.awesome);
imageView.setImageBitmap(getRoundedCornerBitmap(bitmap, 360));
First, you should initialize your ImageView, then you should create a BitMap object and decode which image you want to use. Lastly, you should use setImageBitmap to call your special function. If you want a perfectly circular image, you should send “360” to the pixel parameter.
if you have any question, ask me :)

Only Portrait Mode (ScreenOrientation

Hey,
This is the code segment which makes your Android application just works on Portrait Mode which means you cannot let the application using on landscape mode.

<activity
android:name=".MainActivity"
android:label="@string/app_name"
android:configChanges="orientation"
android:screenOrientation="portrait"
>
You should put the configChanges and screenOrientation method for your every activities.

What is what?

configChanges : Android understands that you will be responsible of the changes of orientation.

screenOrientation : Setting the default orientation mode, you set the which mode you want.

Transparent Status Bar on Fragment and Activity

After using other libraries for just translating the status bar at Android, I found a method.
This method does not require any library or anything, just use this code segment into your @OnCreate method and taa-data :)
Gist:java
@OnCreate
{
  // FullScreen
  getWindow().setFlags(WindowManager.LayoutParams.FLAG_LAYOUT_NO_LIMITS, 
  WindowManager.LayoutParams.FLAG_LAYOUT_NO_LIMITS);
}


xml
// XML : 
<item name="android:windowTranslucentStatus">true</item>


Markdown:
@OnCreate{  
// FullScreen  getWindow().setFlags(WindowManager.LayoutParams.FLAG_LAYOUT_NO_LIMITS, WindowManager.LayoutParams.FLAG_LAYOUT_NO_LIMITS);
} // XML Part
<item name="android:windowTranslucentStatus">true</item>

Fragment Usage

Example: LoginActivity + LoginActivityFragment, you should put this code into LoginActivitynot the fragment one.

Activity Usage

Completely Transparent Status Bar
Be sure to also set the transparency in /res/values-v21/styles.xml:
<item name="android:statusBarColor">@android:color/transparent</item>
Or set the transparency programmatically:
getWindow().setStatusBarColor(Color.TRANSPARENT);
Annotation: This method just works on API 21 and above.
Note: You should add the code segment in styles.xml
<item name="android:windowTranslucentStatus">true</item>
Note 2: This method just works on API 19 and above.
if you have any question, ask me :)


How to convert Bitmap to Uri? [UPDATED]

fun getImageUriFromBitmap(context: Context, bitmap: Bitmap): Uri{
val bytes = ByteArrayOutputStream()
bitmap.compress(Bitmap.CompressFormat.JPEG, 100, bytes)
val path = MediaStore.Images.Media.insertImage(context.contentResolver, bitmap, "Title", null)
return Uri.parse(path.toString())
}


---------------------------------------------------------------------

kotlin
fun getImageUriFromBitmap(context: Context, bitmap: Bitmap): Uri{
    val bytes = ByteArrayOutputStream()
    bitmap.compress(Bitmap.CompressFormat.JPEG, 100, bytes)
    val path = MediaStore.Images.Media.insertImage(context.contentResolver, bitmap, "Title", null)
    return Uri.parse(path.toString())
 }

Read more stories this month when you create a free Medium account. Sign up with Google Sign up with Facebook Already have an account? Sign in Sign in Get started FreakyCoder Software Blog ANDROID IOS REACT NATIVE Android Notes 73 Android Notes 73: How to get Real Path from Uri?

Hey,
If you had a headache to get the real path for your file like me, don’t worry! I have your medicine :)
Here is how to get real path of the file from Uri via MediaStore:
Markdown:
private String getRealPathFromURI(Context context, Uri contentUri) {
    Cursor cursor = null;
    try {
        String[] proj = { MediaStore.Images.Media.DATA };
        cursor = context.getContentResolver().query(contentUri,  proj, null, null, null);
        int column_index = cursor.getColumnIndexOrThrow(MediaStore.Images.Media.DATA);
        cursor.moveToFirst();
        return cursor.getString(column_index);
    } catch (Exception e) {
        Log.e(TAG, "getRealPathFromURI Exception : " + e.toString());
        return "";
    } finally {
        if (cursor != null) {
            cursor.close();
        }
    }
}

Gist:
private String getRealPathFromURI(Context context, Uri contentUri) {
    Cursor cursor = null;
    try {
        String[] proj = { MediaStore.Images.Media.DATA };
        cursor = context.getContentResolver().query(contentUri,  proj, null, null, null);
        int column_index = cursor.getColumnIndexOrThrow(MediaStore.Images.Media.DATA);
        cursor.moveToFirst();
        return cursor.getString(column_index);
    } catch (Exception e) {
        Log.e(TAG, "getRealPathFromURI Exception : " + e.toString());
        return "";
    } finally {
        if (cursor != null) {
            cursor.close();
        }
    }
}

Android Notes 74: How to extract filename from Uri?

Hey,
Firstly, please check these articles :

Android Notes 72: How to convert Bitmap to Uri?

Hey,

freakycoder.com

Android Notes 73: How to get Real Path from Uri?

Hey,

freakycoder.com

Now, we can extract filename with and without extension :)
You will convert your bitmap to uri and get the real path of your file. Now we have a path.
Here is how to extract filename :
Markdown:
Uri uri = getImageUri(bitmap);
String path = getRealPathFromURI(uri);
String filename = path.substring(path.lastIndexOf("/")+1);
String file;
if (filename.indexOf(".") > 0) {
    file = filename.substring(0, filename.lastIndexOf("."));
} else {
    file =  filename;
}
Log.d(TAG, "Real Path: " + path);
Log.d(TAG, "Filename With Extension: " + filename);
Log.d(TAG, "File Without Extension: " + file);
Gist:
If you have any question, ask me :)
Have fun !

Android Studio Tips & Tricks 3: Save & Format the Code

Hey,
Format the code is really important for readability code. So, here is how to save and format the code with a macro.
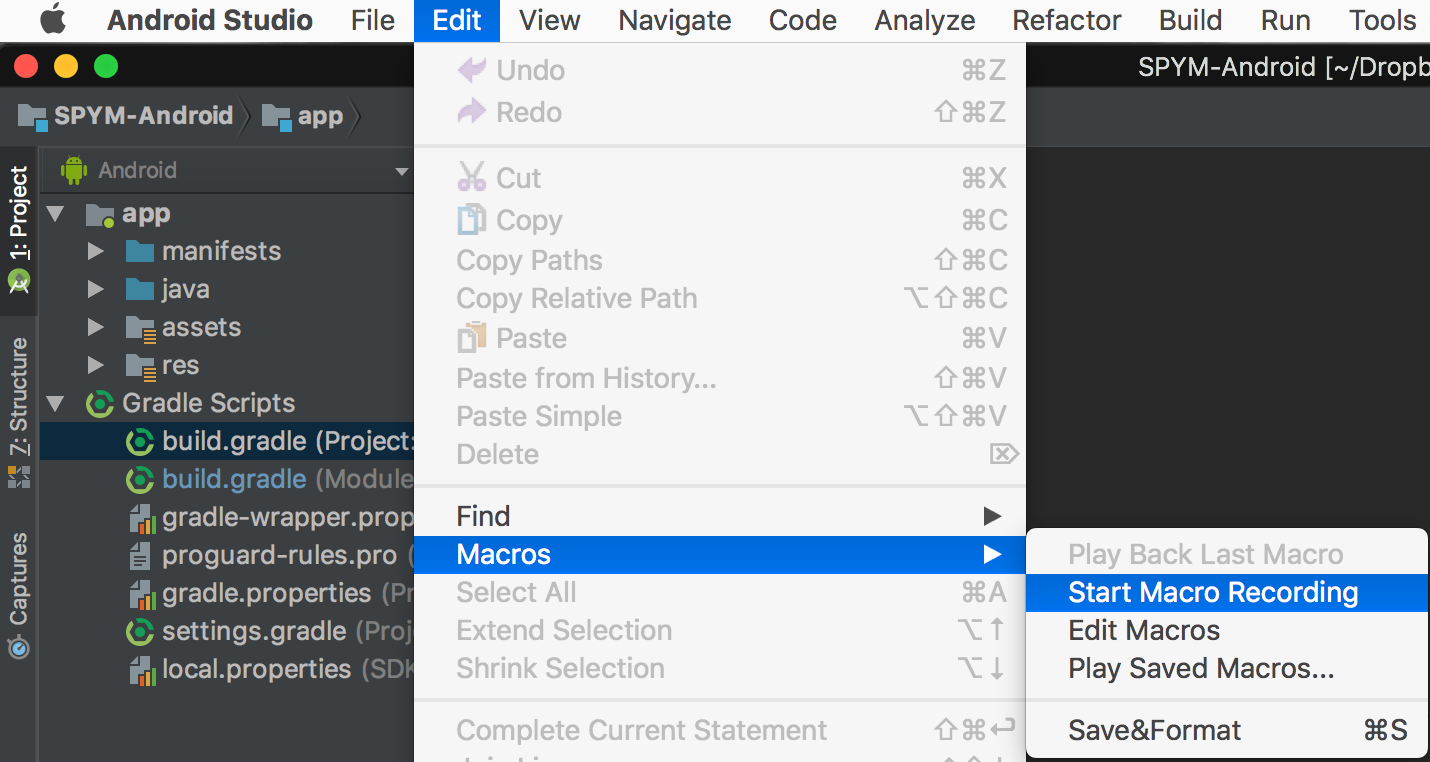
  1. Edit -> Macros -> Start Macro Recording
  2. Press “CTRL+ALT+L” then “CTRL+S”
  3. Enter a name for your macro
Record and save the macro

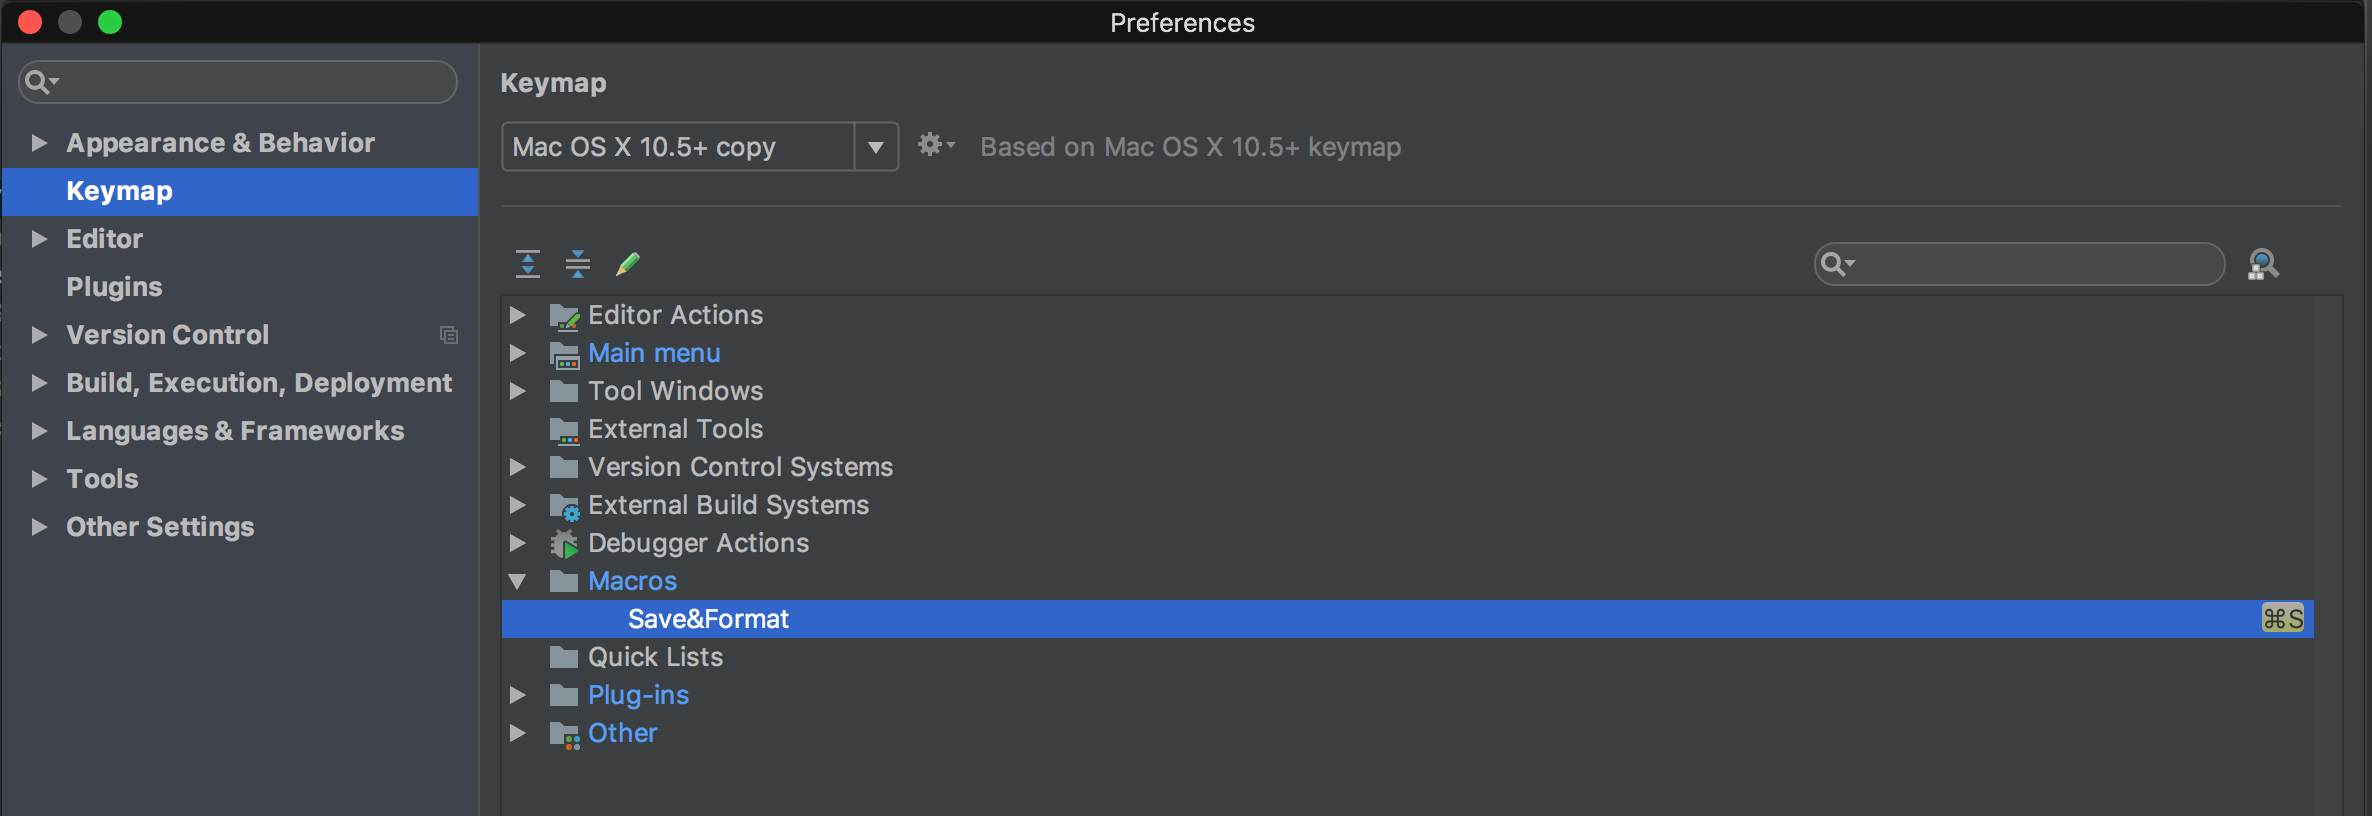
  1. Go to Settings -> Keymap -> Macros
  2. Find your macro and add a keyboard shortcut for it. Mine is ⌘S. You can do which keys you want.
and finally: Ta-daaa :) Now, you can use your macro to save and format the code easily :)
If you have any question, ask me :)
Have fun!

Showing Subtitles/Lyrics on Android Exoplayer

Most of time we implement functionality when we badly requires it.It happens with the most of us. Last Sunday When I was working on the one of my pet project I come with a new idea to show subtitle as the audio plays.
One option was to create a youtube video with subtitle and play with Exoplayer but it was cheap kind of way.So I googled about how to implement it with audio and I found the way to do it so I am going to share with you people.

Step 1

You need to create a subtitle file (In SRT or many supported format by Exo)which contain all text with timings and a logic to display in perfect way.

Step 2

When you are playing just attach one media source to audio player but when you want to display subtitle then you need one extra media source to fetch that subtitle from link.Then you need to combine both media sources.

Step 3

When you are fetching two sources like from web links and it may be the case that these can be large enough to load so you must go for progress bar during buffering so it good to implement it using player callbacks you can find code below.
You may find full code on my github repo.
// Import you package
import android.net.Uri;
import android.os.Bundle;
import android.os.Handler;

import android.support.v7.app.AppCompatActivity;
import android.util.Log;
import android.view.View;
import android.widget.ProgressBar;

import com.google.android.exoplayer2.C;
import com.google.android.exoplayer2.ExoPlaybackException;
import com.google.android.exoplayer2.ExoPlayer;
import com.google.android.exoplayer2.ExoPlayerFactory;
import com.google.android.exoplayer2.Format;
import com.google.android.exoplayer2.PlaybackParameters;
import com.google.android.exoplayer2.Player;
import com.google.android.exoplayer2.SimpleExoPlayer;
import com.google.android.exoplayer2.Timeline;
import com.google.android.exoplayer2.extractor.DefaultExtractorsFactory;
import com.google.android.exoplayer2.source.ConcatenatingMediaSource;
import com.google.android.exoplayer2.source.ExtractorMediaSource;
import com.google.android.exoplayer2.source.MediaSource;
import com.google.android.exoplayer2.source.MergingMediaSource;
import com.google.android.exoplayer2.source.SingleSampleMediaSource;
import com.google.android.exoplayer2.source.TrackGroupArray;
import com.google.android.exoplayer2.text.Cue;
import com.google.android.exoplayer2.text.TextRenderer;
import com.google.android.exoplayer2.trackselection.AdaptiveTrackSelection;
import com.google.android.exoplayer2.trackselection.DefaultTrackSelector;
import com.google.android.exoplayer2.trackselection.TrackSelection;
import com.google.android.exoplayer2.trackselection.TrackSelectionArray;
import com.google.android.exoplayer2.ui.SimpleExoPlayerView;
import com.google.android.exoplayer2.ui.SubtitleView;
import com.google.android.exoplayer2.upstream.BandwidthMeter;
import com.google.android.exoplayer2.upstream.DataSource;
import com.google.android.exoplayer2.upstream.DefaultBandwidthMeter;
import com.google.android.exoplayer2.upstream.DefaultDataSourceFactory;
import com.google.android.exoplayer2.util.MimeTypes;
import com.google.android.exoplayer2.util.Util;
import com.google.android.gms.ads.AdRequest;
import com.google.android.gms.ads.AdView;
import com.google.android.gms.ads.InterstitialAd;
import java.util.ArrayList;
import java.util.List;
import stayrocks.jambh.vani.R;

public class AudioPlayerActivity extends AppCompatActivity {
    private SimpleExoPlayerView simpleExoPlayerView;
    private SimpleExoPlayer player;
    private ProgressBar progressBar;
    private DataSource.Factory mediaDataSourceFactory;
    private DefaultTrackSelector trackSelector;
    private boolean shouldAutoPlay;
    private Handler mainHandler;
    private BandwidthMeter bandwidthMeter;
    private List<String> songsList = new ArrayList<>();
    private SubtitleView subtitles;
    private String srt_link;
    private InterstitialAd mInterstitialAd;
    AdRequest adRequestheader;
    Boolean showAd=false;
    AdView adView;

    @Override
    protected void onStart() {
        super.onStart();
        adRequestheader = new AdRequest.Builder()
                .build();
        mInterstitialAd = new InterstitialAd(this);
        mInterstitialAd.setAdUnitId(getResources().getString(R.string.splash));
        mInterstitialAd.loadAd(adRequestheader);
    }

    @Override
    protected void onCreate(Bundle savedInstanceState) {
        super.onCreate(savedInstanceState);
        setContentView(R.layout.activity_audio_player);

        if(getIntent()!=null){

            String song=getIntent().getStringExtra("link");
            srt_link=getIntent().getStringExtra("srt_link");
            songsList.add(song);

        }
        initRecyclerView();


    }
    private void initRecyclerView() {

        simpleExoPlayerView = (SimpleExoPlayerView) findViewById(R.id.player_view);
        subtitles=(SubtitleView)findViewById(R.id.subtitle);
        progressBar=(ProgressBar)findViewById(R.id.progress_bar);
        adView=(AdView)findViewById(R.id.adView);
        mainHandler = new Handler();
        bandwidthMeter = new DefaultBandwidthMeter();
        mediaDataSourceFactory = new DefaultDataSourceFactory(this, Util.getUserAgent(this, null));
        initializePlayer();

    }

    @Override
    protected void onDestroy() {
        super.onDestroy();
        //player.setPlayWhenReady(false);
    }

    private void initializePlayer() {
        simpleExoPlayerView.requestFocus();
        TrackSelection.Factory videoTrackSelectionFactory =
                new AdaptiveTrackSelection.Factory(bandwidthMeter);
        trackSelector = new DefaultTrackSelector(videoTrackSelectionFactory);
        player = ExoPlayerFactory.newSimpleInstance(this, trackSelector);
        simpleExoPlayerView.setPlayer(player);
        simpleExoPlayerView.getSubtitleView().setVisibility(View.GONE);
        simpleExoPlayerView.setControllerHideOnTouch(true);
        simpleExoPlayerView.setControllerAutoShow(false);
        simpleExoPlayerView.setControllerShowTimeoutMs(0);
        simpleExoPlayerView.setUseArtwork(false);

        try {
            int l=songsList.size();
            MediaSource[] mediaSources = new MediaSource[l];
            for (int i = 0; i < l; i++) {
                Log.e("uri is", songsList.get(i));
                mediaSources[i] = buildMediaSource(Uri.parse(songsList.get(i)));
                Log.e("Media source is", mediaSources[i].toString());
            }

            //Log.e("Media source is", mediaSources.toString());
            MediaSource mediaSource = mediaSources.length == 1 ? mediaSources[0]
                    : new ConcatenatingMediaSource(mediaSources);
            player.prepare(mediaSource);

            //player.seekTo(0, C.TIME_UNSET);

            player.setPlayWhenReady(true);
           // player.setRepeatMode(Player.REPEAT_MODE_ALL);
            player.addTextOutput(new TextRenderer.Output() {
                @Override
                public void onCues(List< Cue> cues) {
                    Log.e("cues are ",cues.toString());
                    if(subtitles!=null){
                        subtitles.onCues(cues);
                    }
                }
            });
            player.addListener(new Player.EventListener() {
                @Override
                public void onTimelineChanged(Timeline timeline, Object manifest) {

                }

                @Override
                public void onTracksChanged(TrackGroupArray trackGroups, TrackSelectionArray trackSelections) {

                }

                @Override
                public void onLoadingChanged(boolean isLoading) {
                    Log.e("",isLoading+" ");

                }

                @Override
                public void onPlayerStateChanged(boolean playWhenReady, int playbackState) {

                    if (playbackState == Player.STATE_BUFFERING){
                        progressBar.setVisibility(View.VISIBLE);
                    } else {
                        progressBar.setVisibility(View.GONE);
                    }

                    switch(playbackState) {
                        case Player.STATE_BUFFERING:

                            break;
                        case Player.STATE_ENDED:
                            if(mInterstitialAd.isLoaded()){
                                mInterstitialAd.show();
                            }
                            //do what you want
                            break;
                        case Player.STATE_IDLE:
                            break;

                        case Player.STATE_READY:
                            try {
                                if (showAd) {
                                    adView.setVisibility(View.VISIBLE);
                                    adView.loadAd(adRequestheader);
                                } else {
                                    adView.setVisibility(View.GONE);
                                }
                            }catch (Exception e){
                                adView.setVisibility(View.GONE);
                            }
                            break;
                        default:
                            break;
                    }

                }

                @Override
                public void onRepeatModeChanged(int repeatMode) {

                }

                @Override
                public void onPlayerError(ExoPlaybackException error) {

                }

                @Override
                public void onPositionDiscontinuity() {

                }

                @Override
                public void onPlaybackParametersChanged(PlaybackParameters playbackParameters) {

                }
            });

           // player.setPlayWhenReady(true);
        }catch (Exception e){

            e.printStackTrace();
        }
    }

    private MediaSource buildMediaSource(Uri uri) {

        MediaSource mediaSource = new ExtractorMediaSource(uri, mediaDataSourceFactory, new DefaultExtractorsFactory(),
                mainHandler, null);
        // For subtitles

        if((srt_link==null|| srt_link=="false" || srt_link.isEmpty())){

            showAd=true;
            return mediaSource;
        }

        Format textFormat = Format.createTextSampleFormat(null, MimeTypes.APPLICATION_SUBRIP,
                Format.NO_VALUE,"hi");
        //Log.e("srt link is",srt_link);
        Uri uriSubtitle = Uri.parse(srt_link);
        MediaSource subtitleSource = new SingleSampleMediaSource(uriSubtitle, mediaDataSourceFactory, textFormat, C.TIME_UNSET);
        MergingMediaSource mergedSource = new MergingMediaSource(mediaSource, subtitleSource);

        return mergedSource;
    }

    private void releasePlayer() {
        if (player != null) {
            shouldAutoPlay = player.getPlayWhenReady();
            if(shouldAutoPlay){

                player.stop();
            }
            mainHandler=null;
            player.release();
            player = null;
            trackSelector = null;
        }
        // player.set
    }

    @Override
    public void onBackPressed() {

        releasePlayer();
        super.onBackPressed();
    }


}
Here in code I am doing three main things. Audio I want to play and Subtitle file link is coming from intent.Means from list of songs I am selecting particular song and then passing it’s audio link and subtitle link. As these are two media resources and We will combine them into one. You can go through buildMediaSource implementation .
Using simpleExoPlayerView.getSubtitleView().setVisibility(View.GONE); I am hiding default Subtitle View and using my own Subtitle View for better control.
<?xml version="1.0" encoding="utf-8"?>
<LinearLayout xmlns:android="http://schemas.android.com/apk/res/android"
    xmlns:app="http://schemas.android.com/apk/res-auto"
    android:layout_width="match_parent"
    android:layout_height="match_parent"
    android:background="@color/black"
    android:orientation="vertical"
    android:keepScreenOn="true"
    xmlns:ads="http://schemas.android.com/apk/res-auto"
    >
<FrameLayout
            android:layout_height="0dp"
            android:layout_width="match_parent"
            android:layout_weight="1"
            >

        <com.google.android.exoplayer2.ui.SubtitleView
            android:layout_width="match_parent"
            android:layout_height="match_parent"
            android:id="@+id/subtitle"
            />

            <com.google.android.gms.ads.AdView
                android:id="@+id/adView"
                android:layout_width="wrap_content"
                android:layout_height="wrap_content"
                android:layout_gravity="center"
                ads:adSize="LARGE_BANNER"
                ads:adUnitId="@string/banner_ad_header" />

            <ProgressBar
                android:id="@+id/progress_bar"
                android:layout_width="48dp"
                android:layout_height="48dp"
                android:layout_gravity="center"/>

        </FrameLayout>

    <com.google.android.exoplayer2.ui.SimpleExoPlayerView
        android:id="@+id/player_view"
        android:layout_width="match_parent"
        android:layout_height="100dp" />


</LinearLayout>
I am using media player callbacks to show loader when it is taking time and keep user experience better.
Another thing I am doing here is that when audio completes I am showing a Splash Ad to get some revenue out of my hard work.
Thanks for reading this, hope you are going to enjoy it.

Adding Menu Items in Navigation Drawer Dynamically

Adding Menu Items in Navigation Drawer Dynamically

Introduction

Android Studio provides support to add Navigation Drawer Activity from IDE itself. With such Activity, it automatically generates menu items for navigation drawer in form of a xml file resource located inside res/menu directory. By default, this xml file is named activity_main_drawer.xml, and contains menu items statically like this:


<?xml version="1.0" encoding="utf-8"?>
<menu xmlns:android="http://schemas.android.com/apk/res/android">

    <group android:checkableBehavior="single">
        <item
            android:id="@+id/nav_camera"
            android:icon="@drawable/ic_menu_camera"
            android:title="Import" />
        <item
            android:id="@+id/nav_gallery"
            android:icon="@drawable/ic_menu_gallery"
            android:title="Gallery" />
        <item
            android:id="@+id/nav_slideshow"
            android:icon="@drawable/ic_menu_slideshow"
            android:title="Slideshow" />
        <item
            android:id="@+id/nav_manage"
            android:icon="@drawable/ic_menu_manage"
            android:title="Tools" />
    </group>

    <item android:title="Communicate">
        <menu>
            <item
                android:id="@+id/nav_share"
                android:icon="@drawable/ic_menu_share"
                android:title="Share" />
            <item
                android:id="@+id/nav_send"
                android:icon="@drawable/ic_menu_send"
                android:title="Send" />
        </menu>

    </item>

</menu>

What if you want to generate or add more menu items dynamically ? If you're like me, then you would not want to have support to add menu items without making changes in static file. One reason for doing so is to be able to read new menu items data from remote servers and generate UI on the fly. In other words, automating UI generation !
Actually, its pretty simple to do so !

Show me code

Here’s code that’s responsible for generating new menu items on the fly.
private void addMenuItemInNavMenuDrawer() {
    NavigationView navView = (NavigationView) findViewById(R.id.nav_view);

    Menu menu = navView.getMenu();
    Menu submenu = menu.addSubMenu("New Super SubMenu");

    submenu.add("Super Item1");
    submenu.add("Super Item2");
    submenu.add("Super Item3");

    navView.invalidate();
}
Call addMenuItemInNavMenuDrawer in onCreate() method before launching your app.
@Override
    protected void onCreate(Bundle savedInstanceState) {
        super.onCreate(savedInstanceState);
        setContentView(R.layout.activity_main);

        ....

        NavigationView navigationView = (NavigationView) findViewById(R.id.nav_view);
        navigationView.setNavigationItemSelectedListener(this);

        addMenuItemInNavMenuDrawer();
    }
And that's pretty much it !
Before Adding New Submenu
Here's how Navigation drawer looks like before adding new sub menu.
After Adding New Submenu
Here's Navigation Drawer after adding brand new submenu.
You can checkout source code at github here

How to extract filename from Uri?

Now, we can extract filename with and without extension :) You will convert your bitmap to uri and get the real path of your file. Now w...